1. Introducción
This document is focused on the use of LinuxCNC, it is intended for readers who have already installed and configured it. Some information on installation is given in the following chapters. The complete documentation on installation and configuration can be found in the integrator’s manual.
2. How LinuxCNC Works
LinuxCNC is a suite of highly-customisable applications for the control of a Computer Numerically Controlled (CNC) mills and lathes, 3D printers, robots, laser cutters, plasma cutters and other automated devices. It is capable of providing coordinated control of up to 9 axes of movement.
At its heart, LinuxCNC consists of several key components that are integrated together to form one complete system:
-
a Graphical User Interface (GUI), which forms the basic interface between the operator, the software and the CNC machine itself;
-
the Hardware Abstraction Layer (HAL), which provides a method of linking all the various internal virtual signals generated and received by LinuxCNC with the outside world, and
-
the high level controllers that coordinate the generation and execution of motion control of the CNC machine, namely the motion controller (EMCMOT), the discrete input/output controller (EMCIO) and the task executor (EMCTASK).
The below illustration is a simple block diagram showing what a typical 3-axis CNC mill with stepper motors might look like:
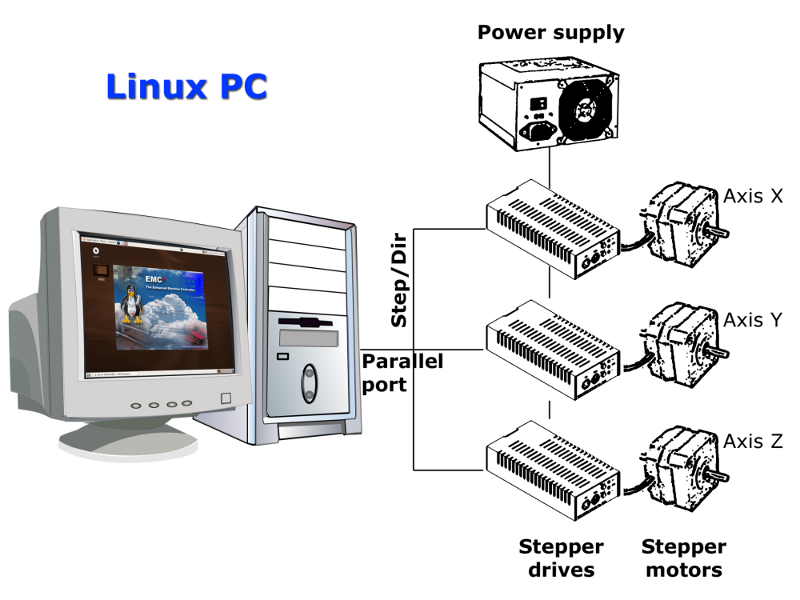
Una computadora que ejecuta LinuxCNC envía una secuencia de impulsos a través del puerto paralelo a las unidades paso a paso; de las cuales cada una tiene un motor paso a paso conectado. Cada unidad recibe dos señales independientes; una señal para ordenar al accionamiento que mueva su motor paso a paso asociado en sentido horario o antihorario (señal de direccion), y una segunda señal (tren de pulsos) que define la velocidad a la que gira el motor paso a paso.
While a stepper motor system under parallel port control is illustrated, a LinuxCNC system can also take advantage of a wide variety of dedicated hardware motion control interfaces for increased speed and I/O capabilities. A full list of interfaces supported by LinuxCNC can be found on the Supported Hardware page of the Wiki.
In most circumstances, users will create a configuration specific to their mill setup using either the Stepper Configuration Wizard (for CNC systems operating using the computers' parallel port) or the Mesa Hardware Wizard (for more advanced systems utilising a Mesa Anything I/O PCI card). Running either wizard will create several folders on the computers' hard drive containing a number of configuration files specific to that CNC machine, and an icon placed on the desktop to allow easy launching of LinuxCNC.
For example, if the Stepper Configuration Wizard was used to create a setup for the 3-axis CNC mill illustrated above entitled My_CNC, the folders created by the wizard would typically contain the following files:
-
Carpeta:
Mi_CNC-
Mi_CNC.ini
El archivo INI contiene toda la información básica del hardware relacionado con el funcionamiento de la fresadora CNC, tales como el número de pasos que debe realizar cada motor paso a paso para completar una revolución completa, la velocidad máxima en que cada paso a paso puede operar, los límites de recorrido de cada eje o la configuración y el comportamiento de interruptores de límite en cada eje. -
Mi_CNC.hal
Este archivo HAL contiene información que le dice a LinuxCNC cómo vincular las señales virtuales internas a conexiones físicas exteriores a la computadora. Por ejemplo, especificando el pin 4 en el puerto paralelo para enviar la señal de dirección de paso del eje Z, o instruir a LinuxCNC para dejar de mover el motor del eje X cuando se activa el interruptor de límite conectado al pin 13 del puerto paralelo. -
custom.HAL
Las personalizaciones para la configuración de la fresadora, más allá del alcance del asistente, pueden realizarse incluyendo enlaces adicionales a otros puntos virtuales dentro de LinuxCNC en este archivo HAL. Al iniciar una sesión de LinuxCNC, este archivo se lee y se procesa antes de cargar la GUI. Por ejemplo, puede incluir iniciar las comunicaciones Modbus con el driver del husillo para que se confirme como operativo antes de que se muestre la GUI. -
custom_postgui.hal
El archivo HAL custom_postgui permite una mayor personalización de LinuxCNC, pero difiere de custom.HAL en que se procesa después de que se muestre la GUI. Por ejemplo, después de establecer comunicaciones Modbus al driver del motor del husillo en custom.hal, LinuxCNC puede usar el archivo custom_postgui para vincular la lectura de la velocidad del husillo desde el driver del motor con un gráfico de barras que se muestra en la GUI. -
postgui_backup.hal
Proporciona una copia de seguridad del archivo custom_postgui.hal para permitir al usuario restaurar rápidamente una configuración HAL postgui que funcionaba anteriormente. Esto es especialmente útil si el usuario desea ejecutar el Asistente de configuración nuevamente bajo el mismo nombre, Mi_CNC, para modificar algunos parámetros. Al guardar la nueva configuración con el asistente, se sobrescribirá el archivo custom_postgui existente mientras que el archivo postgui_backup queda intacto. -
tool.tbl
Un archivo de tabla de herramientas contiene una lista parametrizada de cualquier herramienta de corte utilizada. Estos parámetros puede incluir el diámetro y la longitud del cortador, y se utiliza para proporcionar un catálogo de datos que le dice a LinuxCNC cómo compensar su movimiento para herramientas de diferentes tamaños dentro de una operación de fresado.
-
-
Carpeta:
nc_files
La carpeta nc_files se proporciona como la ubicación predeterminada para almacenar los programas de código G utilizados en la máquina. También incluye varias subcarpetas con ejemplos de código G.
3. Graphical User Interfaces
A graphical user interface is the part of the LinuxCNC that the machine tool operator interacts with. LinuxCNC comes with several types of user interfaces which may be chosen from by editing certain fields contained in the INI file:
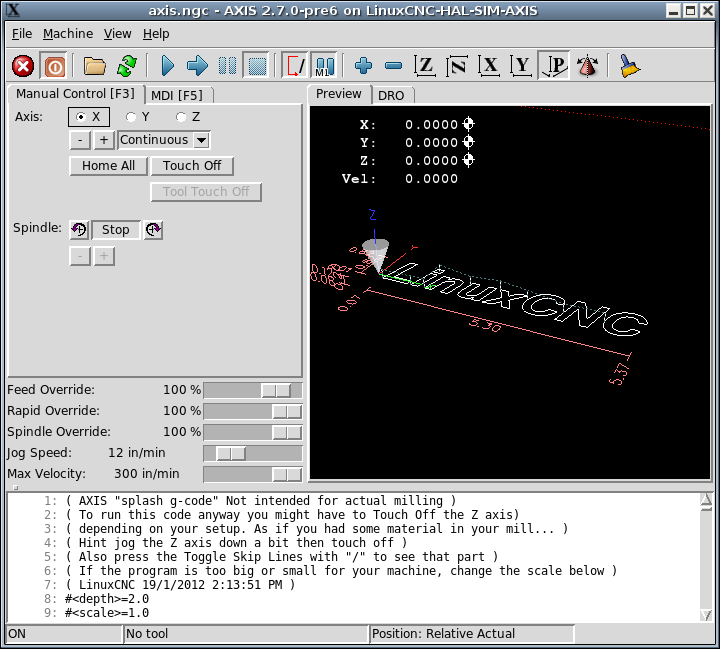
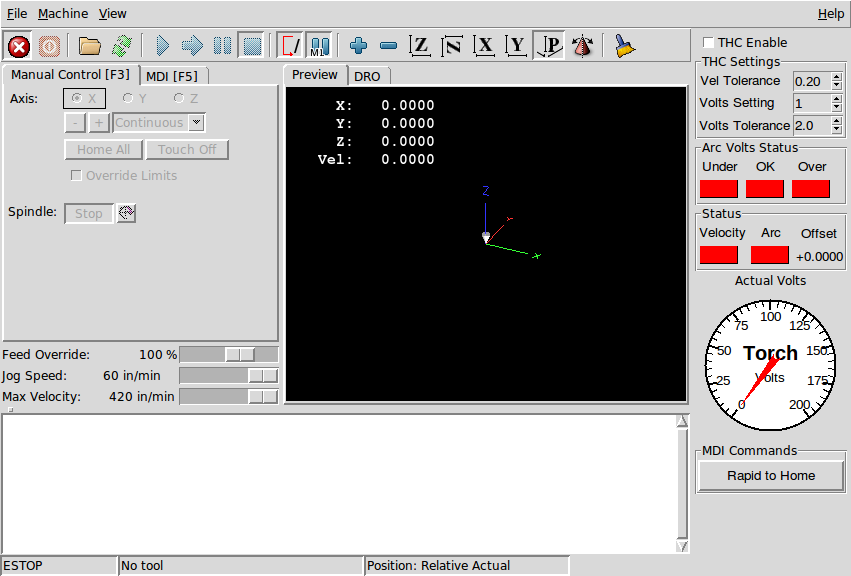
- AXIS
-
AXIS, the standard keyboard GUI interface. This is also the default GUI launched when a Configuration Wizard is used to create a desktop icon launcher:
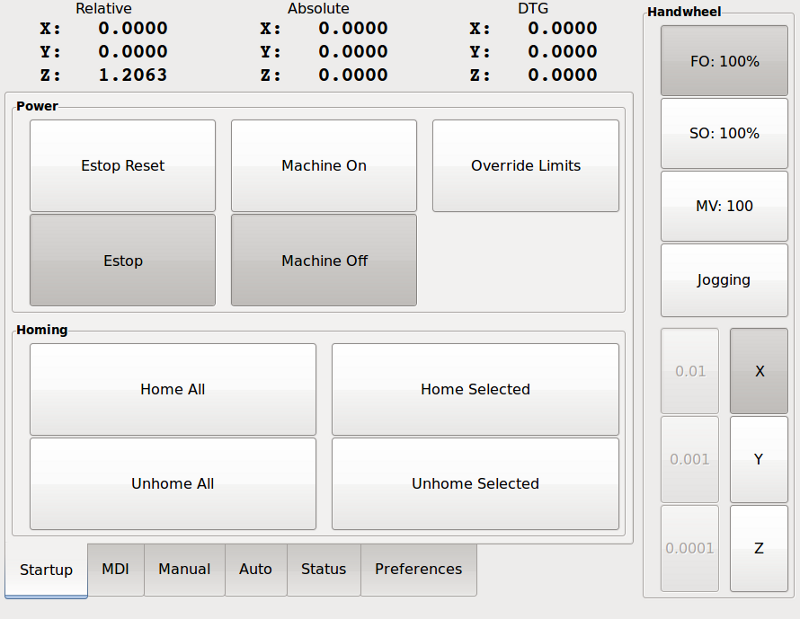
- Touchy
-
Touchy, a touch screens GUI:
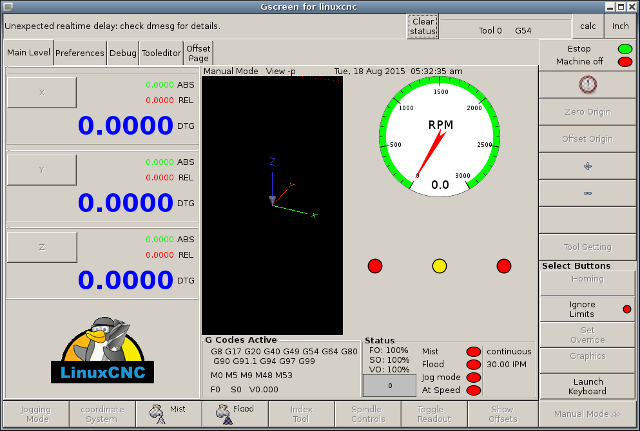
- Gscreen
-
Gscreen, a user-configurable touch screen GUI:
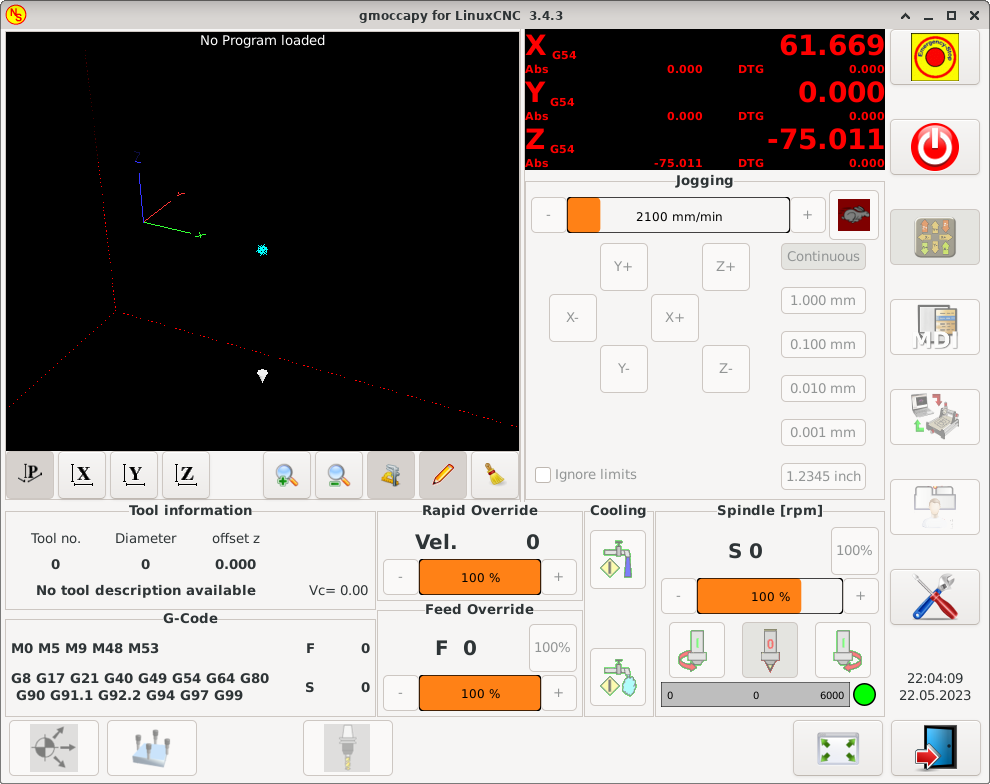
- GMOCCAPY
-
GMOCCAPY, a touch screen GUI based on Gscreen. GMOCCAPY is also designed to work equally well in applications where a keyboard and mouse are the preferred methods of controlling the GUI:
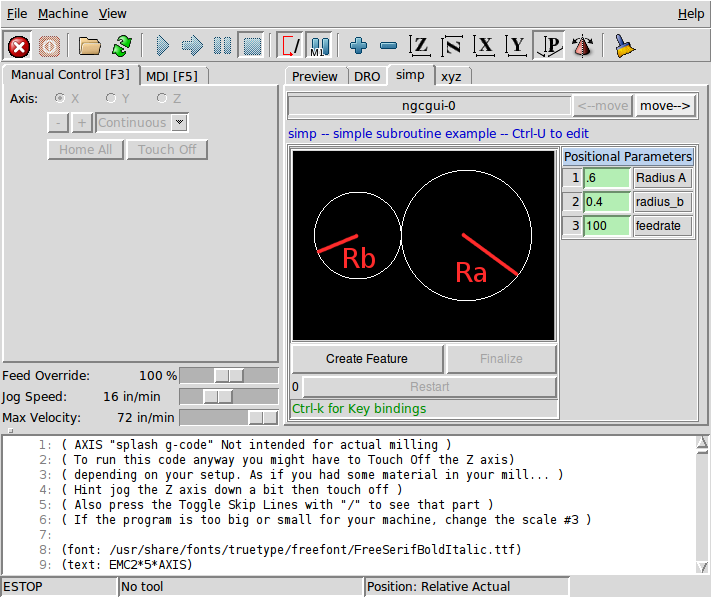
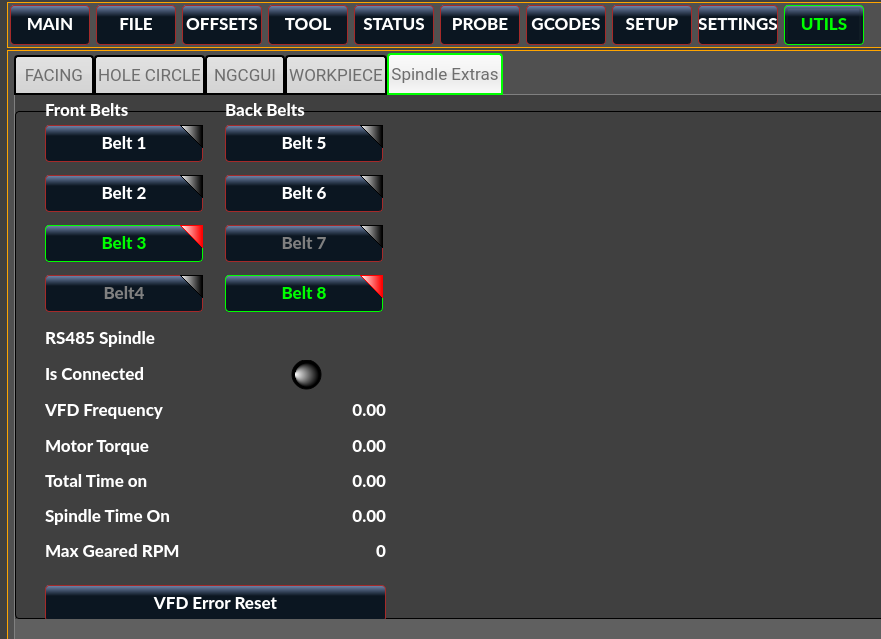
- NGCGUI
-
NGCGUI, a subroutine GUI that provides wizard-style programming of G code. NGCGUI may be run as a standalone program or embedded into another GUI as a series of tabs. The following screenshot shows NGCGUI embedded into AXIS:
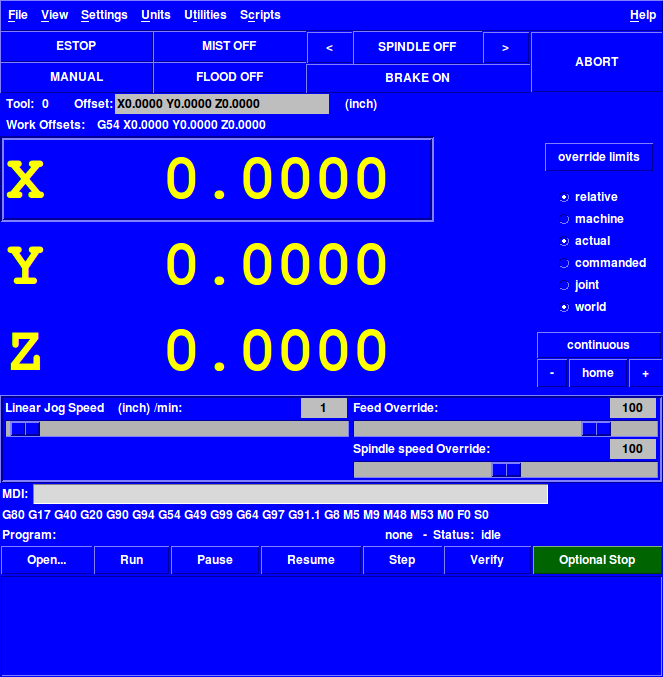
- TkLinuxCNC
-
TkLinuxCNC, another interface based on Tcl/Tk. Once the most popular interface after AXIS.
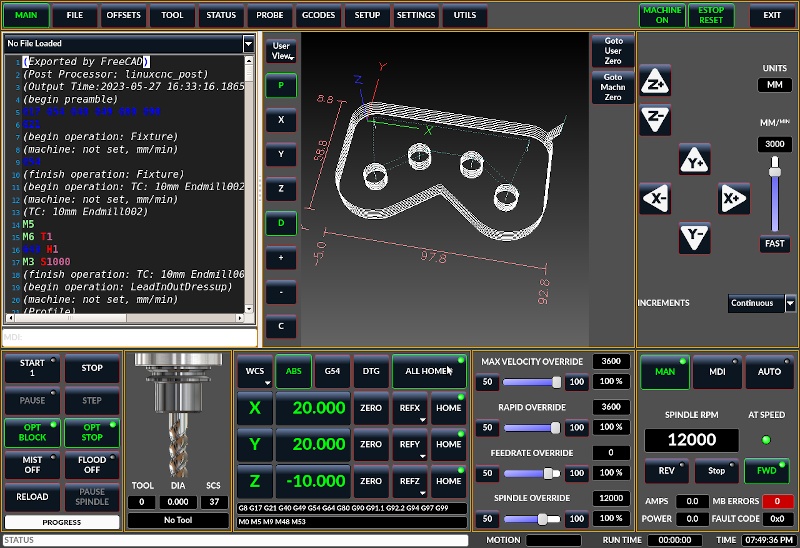
- QtDragon
-
QtDragon, a touch screen GUI based on QtVCP using the PyQt5 library. It comes in two versions QtDragon and QtDragon_hd. They are very similar in features but QtDragon_hd is made for larger monitors.
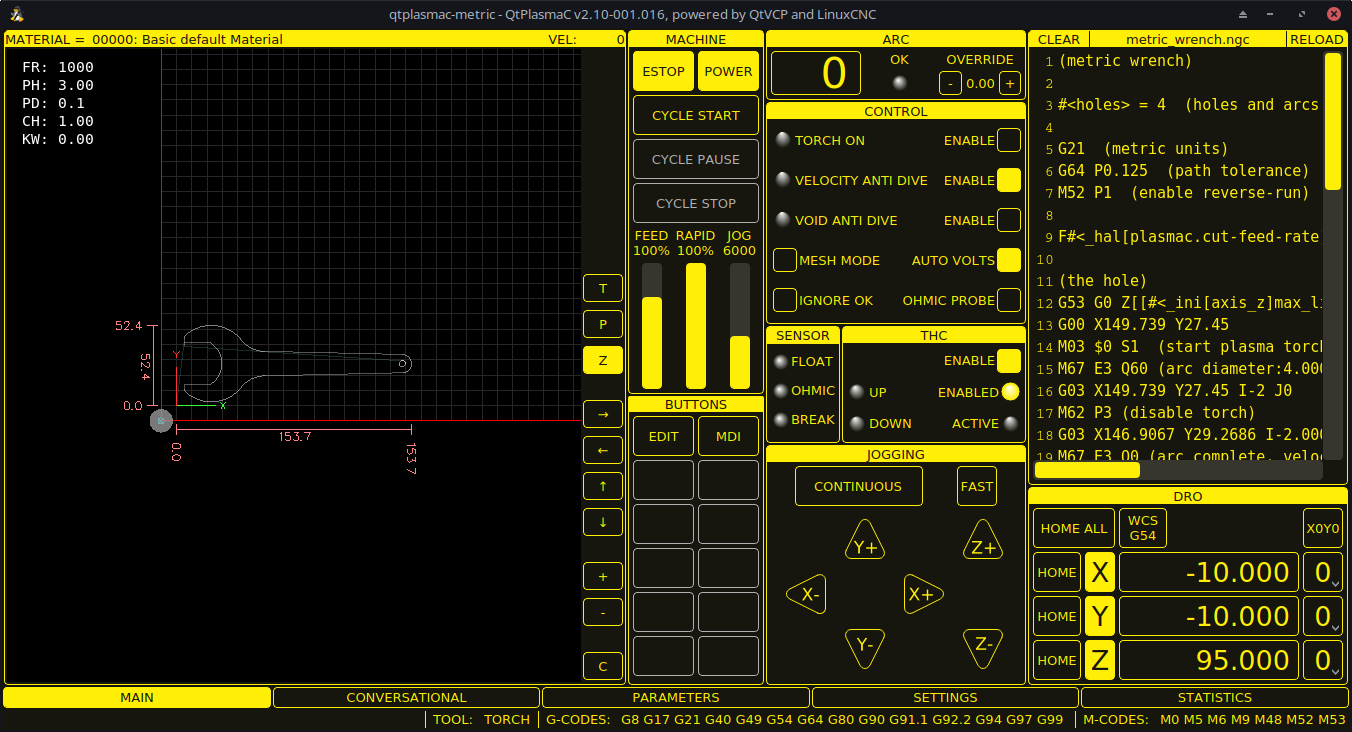
- QtPlasmaC
-
QtPlasmaC, a touch screen plasma cutting GUI based on QtVCP using the PyQt5 library. It comes in three aspect ratios, 16:9, 4:3, and 9:16.
4. Interfaces de usuario
These User interfaces are a way to interact with LinuxCNC outside of the graphical user interfaces.
- halui
-
A HAL based user interface allowing to control LinuxCNC using buttons and switches
- linuxcncrsh
-
A telnet based user interface allowing to send commands from remote computers.
5. Paneles Virtuales de Control
As mentioned above, many of LinuxCNC’s GUIs may be customized by the user. This may be done to add indicators, readouts, switches or sliders to the basic appearance of one of the GUIs for increased flexibility or functionality. Two styles of Virtual Control Panel are offered in LinuxCNC:
- PyVCP
-
PyVCP, a Python-based virtual control panel that can be added to the AXIS GUI. PyVCP only utilises virtual signals contained within the Hardware Abstraction Layer, such as the spindle-at-speed indicator or the Emergency Stop output signal, and has a simple no-frills appearance. This makes it an excellent choice if the user wants to add a Virtual Control Panel with minimal fuss.
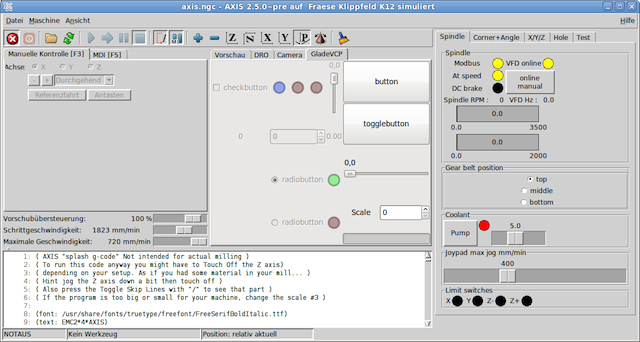
- GladeVCP
-
GladeVCP, a Glade-based virtual control panel that can be added to the AXIS or Touchy GUIs. GladeVCP has the advantage over PyVCP in that it is not limited to the display or control of HAL virtual signals, but can include other external interfaces outside LinuxCNC such as window or network events. GladeVCP is also more flexible in how it may be configured to appear on the GUI:
- QtVCP
-
QtVCP, a PyQt5-based virtual control panel that can be added to most GUIs or run as a standalone panel. QtVCP has the advantage over PyVCP in that it is not limited to the display or control of HAL virtual signals, but can include other external interfaces outside LinuxCNC such as window or network events by extending with python code. QtVCP is also more flexible in how it may be configured to appear on the GUI with many special widgets:
6. Languages
LinuxCNC uses translation files to translate LinuxCNC User Interfaces into many languages including French, German, Italian, Finnish, Russian, Romanian, Portuguese and Chinese. Assuming a translation has been created, LinuxCNC will automatically use whatever native language you log in with when starting the Linux operating system. If your language has not been translated, contact a developer on IRC, the mailing list or the User Forum for assistance.
7. Think Like a CNC Operator
This manual does not pretend to teach you how to use a lathe or a milling machine. Becoming an experienced operator takes a lot of time and requires a lot of work. An author once said, We learn by experience, if one possesses it all. Broken tools, vices attacked and the scars are evidence of the lessons learned. A beautiful finish, tight tolerances and caution during the work are evidence of lessons learned. No machine nor program can replace human experience.
Now that you start working with the LinuxCNC software, you have to put yourself in the shoes of an operator. You must be in the role of someone in charge of a machine. It’s a machine that will wait for your commands and then execute the orders that you will give it. In these pages, we will give the explanations which will help you to become a good CNC operator with LinuxCNC.
8. Modes of Operation
When LinuxCNC is running, there are three different major modes used for inputting commands. These are Manual, Auto, and Manual Data Input (MDI). Changing from one mode to another makes a big difference in the way that the LinuxCNC control behaves. There are specific things that can be done in one mode that cannot be done in another. An operator can home an axis in manual mode but not in auto or MDI modes. An operator can cause the machine to execute a whole file full of G-codes in the auto mode but not in manual or MDI.
In manual mode, each command is entered separately. In human terms a manual command might be "turn on coolant" or "jog X at 25 inches per minute". These are roughly equivalent to flipping a switch or turning the hand wheel for an axis. These commands are normally handled on one of the graphical interfaces by pressing a button with the mouse or holding down a key on the keyboard. In auto mode, a similar button or key press might be used to load or start the running of a whole program of G-code that is stored in a file. In the MDI mode the operator might type in a block of code and tell the machine to execute it by pressing the <return> or <enter> key on the keyboard.
Some motion control commands are available concurrently and will cause the same changes in motion in all modes. These include Abort, Emergency Stop, and Feed Rate Override. Commands like these should be self explanatory.
The AXIS user interface hides some of the distinctions between Auto and the other modes by making auto-commands available at most times. It also blurs the distinction between Manual and MDI, because some Manual commands like Touch Off are actually implemented by sending MDI commands. It does this by automatically changing to the mode that is needed for the action the user has requested.